 Thinking in React
# 11. Thinking in React (Principles for Building Complex Components)
One of the many great parts of React is how it makes you think about apps as you build them. In this document, we'll walk you through the thought process of building a searchable product data table with React.
# Start With A Mock
# Step 1: Break The UI Into A Component Hierarchy
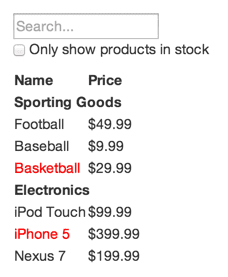
First, draw boxes around every component (and sub-component) in the mockup.

You'll see we have five components in our app. We've italicized the data each component represents.
FilterableProductTable(orange): contains the entirety of the exampleSearchBar(blue): receives all user inputProductTable(green): displays and filters the data collection based on user inputProductCategoryRow(cyan): displays a heading for each categoryProductRow(red): displays a row for each product
You may notice that ProductTable's header (containing "Name" and "Price") isn't its own component. This is a matter of preference, and there's an argument to be made either way. (Simple elements don't necessarily need to be separate components, but complex ones benefit from being independent components.)
Component hierarchy:
FilterableProductTableSearchBarProductTableProductCategoryRowProductRow
# Step 2: Build A Static Version in React
Build a version that renders the UI from the data model without interactivity. It's best to decouple the process of building a static version from adding interactivity.
This is because building a static version requires a lot of typing and no thinking, while adding interactivity requires a lot of thinking and not a lot of typing.
When building a static version, you'll want to build components that reuse other components and pass data using props. props are a way of passing data from parent to child. Even if you're familiar with the concept of state, don't use state at all to build this static version. State is reserved only for interactivity.
You can build top-down or bottom-up: top-down means building high-level components first (like FilterableProductTable), bottom-up means starting from the most basic components (like ProductRow). In simpler examples, it's usually easier to go top-down; on larger projects, it's easier to go bottom-up and write tests as you build.
React's one-way data flow (also called one-way binding) keeps everything modular and fast.
In React, there are two types of "model" data: props and state. It's important to understand the distinction between the two.
# Step 3: Identify The Minimal (but complete) Representation Of UI State
Keep only the minimal set of mutable state that your app needs. Everything else should be computed on demand.
Data that can be derived from state doesn't need its own state!
To determine whether something is props or state, ask these three questions about each piece of data:
- Is it passed in from a parent via props? If so, it probably isn't state.
- Does it remain unchanged over time? If so, it probably isn't state.
- Can you compute it based on any other state or props in your component? If so, it isn't state.
What is NOT state:
- Passed in from a parent component
- Doesn't change over time
- Can be computed from other state or props
# Step 4: Identify Where Your State Should Live
We need to identify which component should own and mutate the state.
Remember: React is all about one-way data flow down the component hierarchy.
For each piece of state in your application:
- Identify every component that renders something based on that state.
- Find a common owner component (a single component above all the components that need the state in the hierarchy).
- Either the common owner or another component higher up in the hierarchy should own the state.
- If you can't find a component where it makes sense to own the state, create a new component solely for holding the state and add it somewhere in the hierarchy above the common owner component.
# Step 5: Add Inverse Data Flow
Let data flow in the opposite direction: form components deeper in the hierarchy need to update state in higher-level components.
Implementation:
The parent component has a callback function that can modify state, and passes it to child components.
The child component's input changes are detected via
onChange, which calls the parent's callback function.