 Git Branches - Branch Internals
# Git Branches - Branch Internals
Git handles branches in an incredibly lightweight manner. Creating a new branch is nearly instantaneous, and switching between branches is equally fast. Unlike many other version control systems, Git encourages frequent use of branches and merges in its workflow, even many times within a single day.
# The First Commit
When you make a commit, Git saves a commit object.
Suppose you have a working directory with three files to be staged and committed. The staging operation computes a checksum for each file (using the SHA-1 hashing algorithm), saves the current version of each file as a snapshot in the Git repository (Git uses blob objects to store them), and finally adds the checksums to the staging area for committing:
$ git add README test.rb LICENSE
$ git commit -m 'The initial commit of my project'
2
When you create a commit with git commit, Git first computes the checksum for each subdirectory (only the root directory in this example) and saves those as tree objects in the Git repository. Git then creates a commit object that, in addition to the information mentioned above, contains a pointer to the tree object (the project root directory). This way, Git can recreate the saved snapshot whenever needed.
Now the Git repository has five objects: three blob objects (saving file snapshots), one tree object (recording the directory structure and blob object indexes), and one commit object (containing a pointer to the tree object and all commit information).
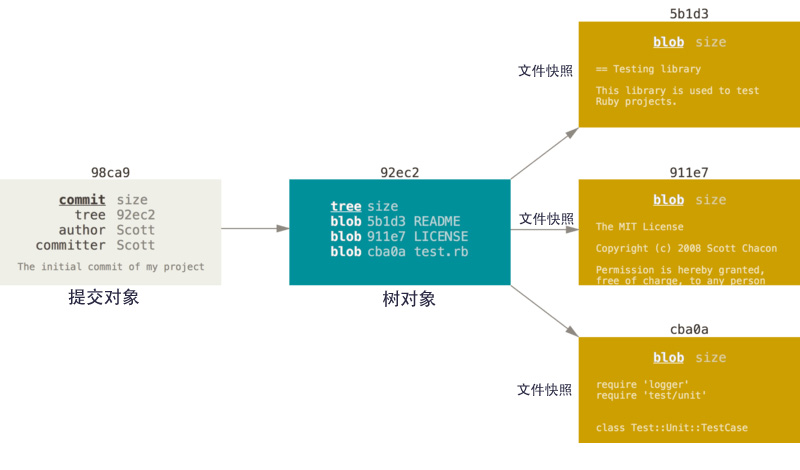
Figure 1. First commit object and its tree structure
# Summary:
git addstages files, computing a checksum for each file and creating corresponding file snapshots (blob objects).git commitcreates a commit, computing the checksum for subdirectories or the root directory and saving them as tree objects. Then, a commit object is created containing a pointer to the tree object and all commit information.
# Subsequent Commits
After making changes and committing again, the new commit object will contain a pointer to the previous commit object (the parent object).
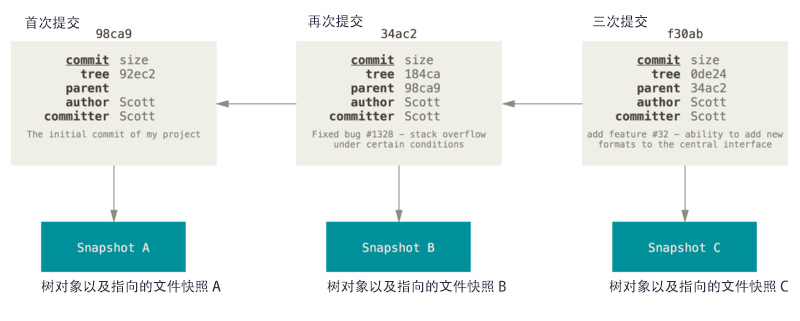
Figure 2. Commit objects and their parent objects
# Git Branches
A Git branch is essentially just a movable pointer to a commit object. Git's default branch name is master. After multiple commits, you already have a master branch pointing to the last commit object. The master branch pointer automatically moves forward with each commit.
Git's
masterbranch is not a special branch. It is exactly the same as any other branch.

Figure 3. A branch and its commit history
# Creating a Branch
How does Git create a new branch? It simply creates a new movable pointer for you. For example, to create a testing branch, you use the git branch command:
$ git branch testing
This creates a new pointer at the current commit object.
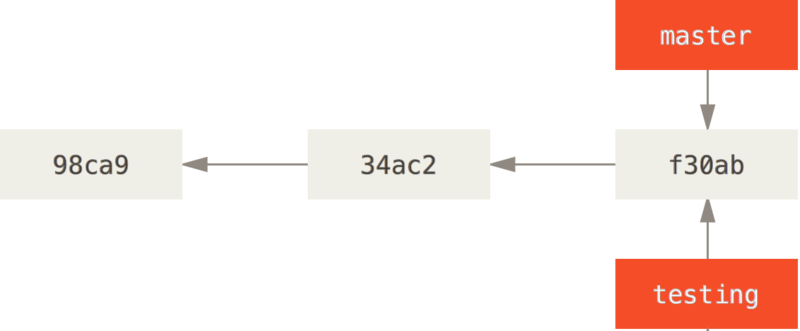
Figure 4. Two branches pointing to the same commit history
# The Current Branch Pointer
How does Git know which branch you are currently on? It uses a special pointer called HEAD that points to the current local branch (think of HEAD as an alias for the current branch). In this example, you are still on the master branch because the git branch command only creates a new branch; it does not automatically switch to the new branch.
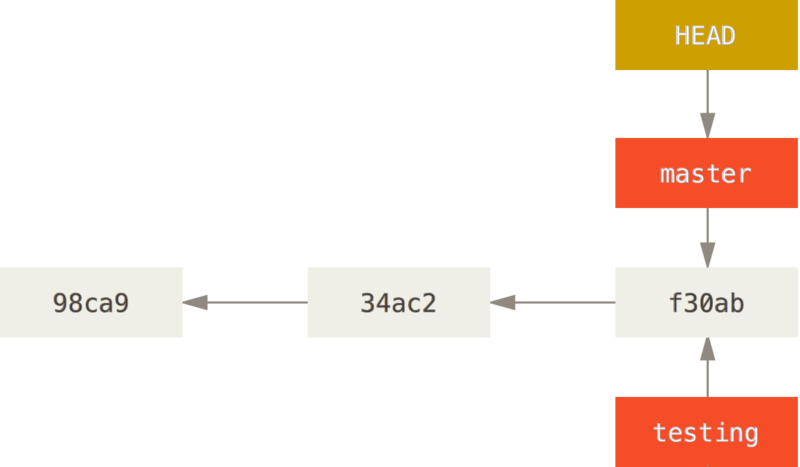
Figure 5. HEAD pointing to the current branch
# Viewing the Current Branch
You can use git log to see where each branch currently points. The --decorate flag provides this feature.
$ git log --oneline --decorate
f30ab (HEAD -> master, testing) add feature # f30ab commit object (HEAD current branch -> master branch, testing branch)
34ac2 Fixed bug # 34ac2 commit object
98ca9 The initial commit of my project # 98ca9 commit object
2
3
4
As you can see, both the master and testing branches point to the commit object starting with f30ab.
# Switching Branches
$ git checkout testing # git checkout <branch-name>
This moves HEAD to point to the testing branch.
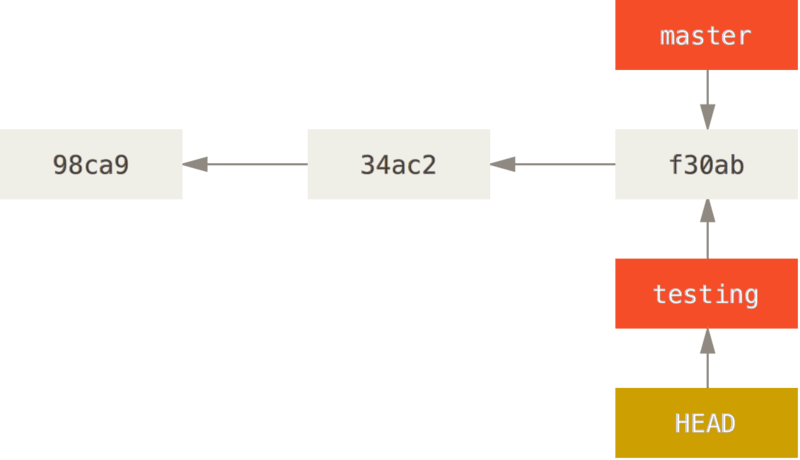
Figure 6. HEAD pointing to the current branch
What benefit does this give us? Let's make another commit:
$ vim test.rb
$ git commit -a -m 'made a change'
2
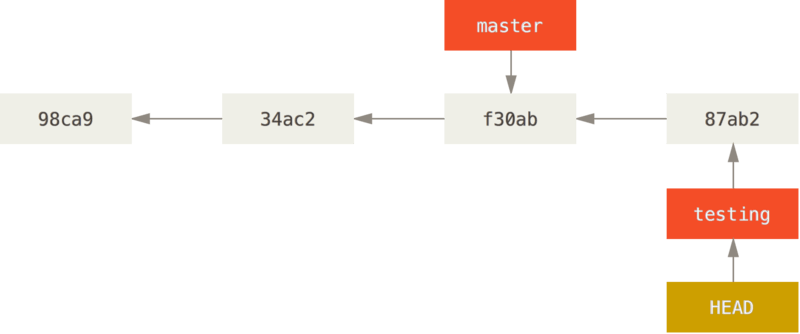
Figure 7. The HEAD branch moves forward with each commit
As shown, your testing branch has moved forward, but the master branch has not -- it still points to the commit it was on when you ran git checkout. Now let's switch back to the master branch:
$ git checkout master
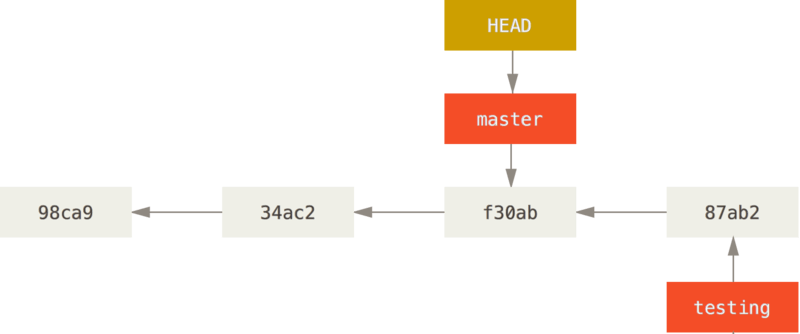
Figure 8. HEAD moves when you check out a branch
This command does two things: it moves HEAD back to the master branch, and it restores the working directory to the snapshot that master points to. This means that any changes you make now will diverge from an older version of the project. Essentially, this ignores the work done in the testing branch so you can go in a different direction.
Let's make a few more changes and commit:
$ vim test.rb
$ git commit -a -m 'made other changes'
2
Now the project history has diverged (see Divergent history (opens new window)). You created a new branch, switched to it and did some work, then switched back to the master branch and did different work. Both changes are isolated in separate branches: you can switch back and forth between branches and merge them when ready. All you need are the branch, checkout, and commit commands.

Figure 9. Divergent project history
You can view the divergent history using git log. Run git log --oneline --decorate --graph --all to see your commit history, where each branch points, and how branches have diverged.
$ git log --oneline --decorate --graph --all
* c2b9e (HEAD, master) made other changes
| * 87ab2 (testing) made a change
|/
* f30ab add feature
* 34ac2 fixed bug
* 98ca9 initial commit of my project
2
3
4
5
6
7
Because a Git branch is actually a simple file containing the 40-character SHA-1 checksum of the commit it points to, creating and destroying branches is extremely cheap. Creating a new branch is as simple as writing 41 bytes to a file (40 characters plus a newline) -- how could it not be fast?
This stands in stark contrast to how most older version control systems handle branching, where creating a branch involves copying all project files to a separate directory. This tedious process can take several seconds or even several minutes, depending on the project size. In Git, a new branch can be created instantly regardless of project size. Also, because each commit records its parent object, finding a proper merge base (i.e., the common ancestor) is equally simple and efficient. These efficient features encourage developers to create and use branches frequently.
# Creating and Switching to a Branch
Typically, you create a new branch and immediately switch to it using:
git checkout -b <newbranchname>